Showing posts with label DIY. Show all posts

Sunday, January 5, 2014

Our Beloved Card Catalog


Remember this beauty?  After casually looking for an old card catalog for over a year, we finally found her at an antique store.  This piece of furniture is no joke, y'all.  It's actually three separate sections of 15 drawers a piece (plus the legs and the pull-out shelf inserts) that easily stack on top of one another.  And it is really well-made.  Everything is solid wood and the joints are even dove-tailed.  So beautiful.  Except for the finish.  We weren't crazy about the honey-colored wood.  


So we re-stained it. And we went the lazy way: a gel stain instead of sanding, re-staining and sealing each surface.    We used Minwax Gel Stain, in hickory. All you do is brush it on (we used a foam craft brush) in a thin coat and let it dry.  Disclaimer: the directions say to wipe it off with a rag a couple minutes after you brush it on, but this didn't work for us at all.  We were wiping away all the color.  So we just decided to not wipe, and it worked just fine.  You can still see the grain of the wood and with a top coat of clear poly, it's actually quite durable.  We certainly hope so; we imagine this baby will in the family for generations  :) 


So, what are we using those 45 drawers for, you ask?   Well, being the nerds we are, it's our alphabetized small-item storage system.  Each drawer is labeling (in alphabetical order) and all the small knick-knacks that end up in random corners of our house are collected, stored and ready to retrieved.  For instance, "where's my flask?", Jake might ask.  "Under F", we can now confidently answer.  A lot of people are surprised that we have enough small random items to fill a card catalog.  Well, we do.  


For instance, under "F" we have flashlights, a flask, flashcards and fly traps.  Under "T" we have tape, thumb drives and a guitar tuner.  


Some drawers contain only one type of item (like charges and cameras); they get their own label.  


We like to think Mr.bDewey himself would approve. He was, after all, all about finding exactly what you need with ease.  Sort of.

Sunday, January 27, 2013

Painted Chevron Table Runner


Who doesn't love a good chevron print?  It seems like this pattern is everywhere these days.  And I'm not complaining because I love bold graphic prints.  But I do wonder how long the trend will last and I'm hesitant to sink too much money into a big chevron rug or too much time into stenciling a whole wall in the pattern.  Which is why I'm a sucker for cheap, quick DIY projects like this one.  

Here's the link to the original project description for a painted chevron pillow.  Wanting something fresh for Christmas for our dining room table, I decided to turn it into a table runner project instead. Although, the colors I chose for the Christmas runner turned out...ummm...less than lovely.  I was going for a classy red and a light shimmery champagne combo, but it turned out red and bright yellow.  It felt a little too "school-house".  So I used the left over fabric and some other paints laying around and made another one for non-Christmas decore.  As you'll see below, the "in progress" pictures are from the Christmas trial (and error), and the finished project pictures are from the second take, which turned out much better.  Here's the quick rundown: 

Supplies: 
-2-3 yards of white cotton fabric (depending on the length of runner you want)
-fabric scissors
-No Sew fusible web tape (or a sewing machine, if you'd prefer to sew up the edges)
-painter's tape
-acrylic or fabric paint (one or two colors)
-ruler


Fusible web tape is such a great option for when you need a quick finished edge and don't feel like threading your sewing machine (which is seriously one of the hardest steps in sewing for me; it feels  like a crazy maze that someone's using to trick me).   The directions are on the package, but basically you just iron the seam you want "sewn" (in my case, 1/2 inch around all edges), put a stretch of tape under the seam, iron over it again (with a damp cloth over the fabric) and it's done.  Here's what my seams looked like after using the fusible web tape. 


Then you tape our your pattern, which in my case was a chevron with vertical lines trisecting the pattern. For a 6-foot-long runner, this takes a while.  But a couple hours on a Sunday afternoon with Arrested Development reruns on in the background, and you're good to go.  A good taping job makes all the difference in creating sharp, crisp paint lines. Then, of course, you paint the resulting white parallelograms (aw-yeah, 6th grade geometry), in alternating colors.   Let the paint dry for a couple hours, then carefully peel away the tape.  Voila!


A note about the paint:  there is such a thing as fabric paint, but for some reason the only fabric paints I could find at the craft store were super ugly colors--primary colors, neons and nothing else--as if it were still the 1980's.   And as I learned in my first attempt, the right color is essential to the final product.  So I recommend using regular craft paint MIXED with a textile medium, which makes the paint fabric-friendly (and machine-washable).  


Thursday, December 6, 2012

Book Page Wreath


So remember these beautiful old books?


Well, due to a secret project Jake is working on, we have a bunch of left over book pages.  And they are lovely.  So I've been hunting on the internet for great crafts for old book pages and found a few.  This one struck my fancy, though.  Seemed simple, inexpensive and the right balance beween crafty and chic.  Done. 

I made a few adaptations from the original tutorial, so I'll give you a quick run-down of my process. 

I bought a foam wreath form (with a flat, not fully rounded back) at Michaels, pulled out my trusty glue gun and got to folding.  I decided to use the pages from an old dictionary because of the graphic feel of the page layout.  One or two pages at a time I fanned the page (accordion style) and then folded up about 3/4 in of the bottom. 

 Then, hot glue that fold to the wreath form like so.  I started on the outside edge of the wreath with the pages fanning out.  And I added about three or four layers, or rows, of fans moving inward. The fold is less important at the outer edges (where you want the page to stick straight out) and more important as you move inward; the fold will create the volume you want.


Since you want the page fans to stay in place, you might have to glue other parts of the folded pages together (especially the inner, main fold like below). 

Once you reach the final row, you change tactics.  Instead of gluing the folded edge to the main part of the wreath, you fold it under, gluing it to the back as well as the foam border on the inner circle. Again, make sure you glue all the right folds and creases so that the pages stay where you want them. 


The back will look like this.


Then, tie a pretty ribbon on it and it's ready to hang!  I went with the simple look, but you could add some embellishments if you wanted. 


Sunday, November 4, 2012

Painting the Buffet


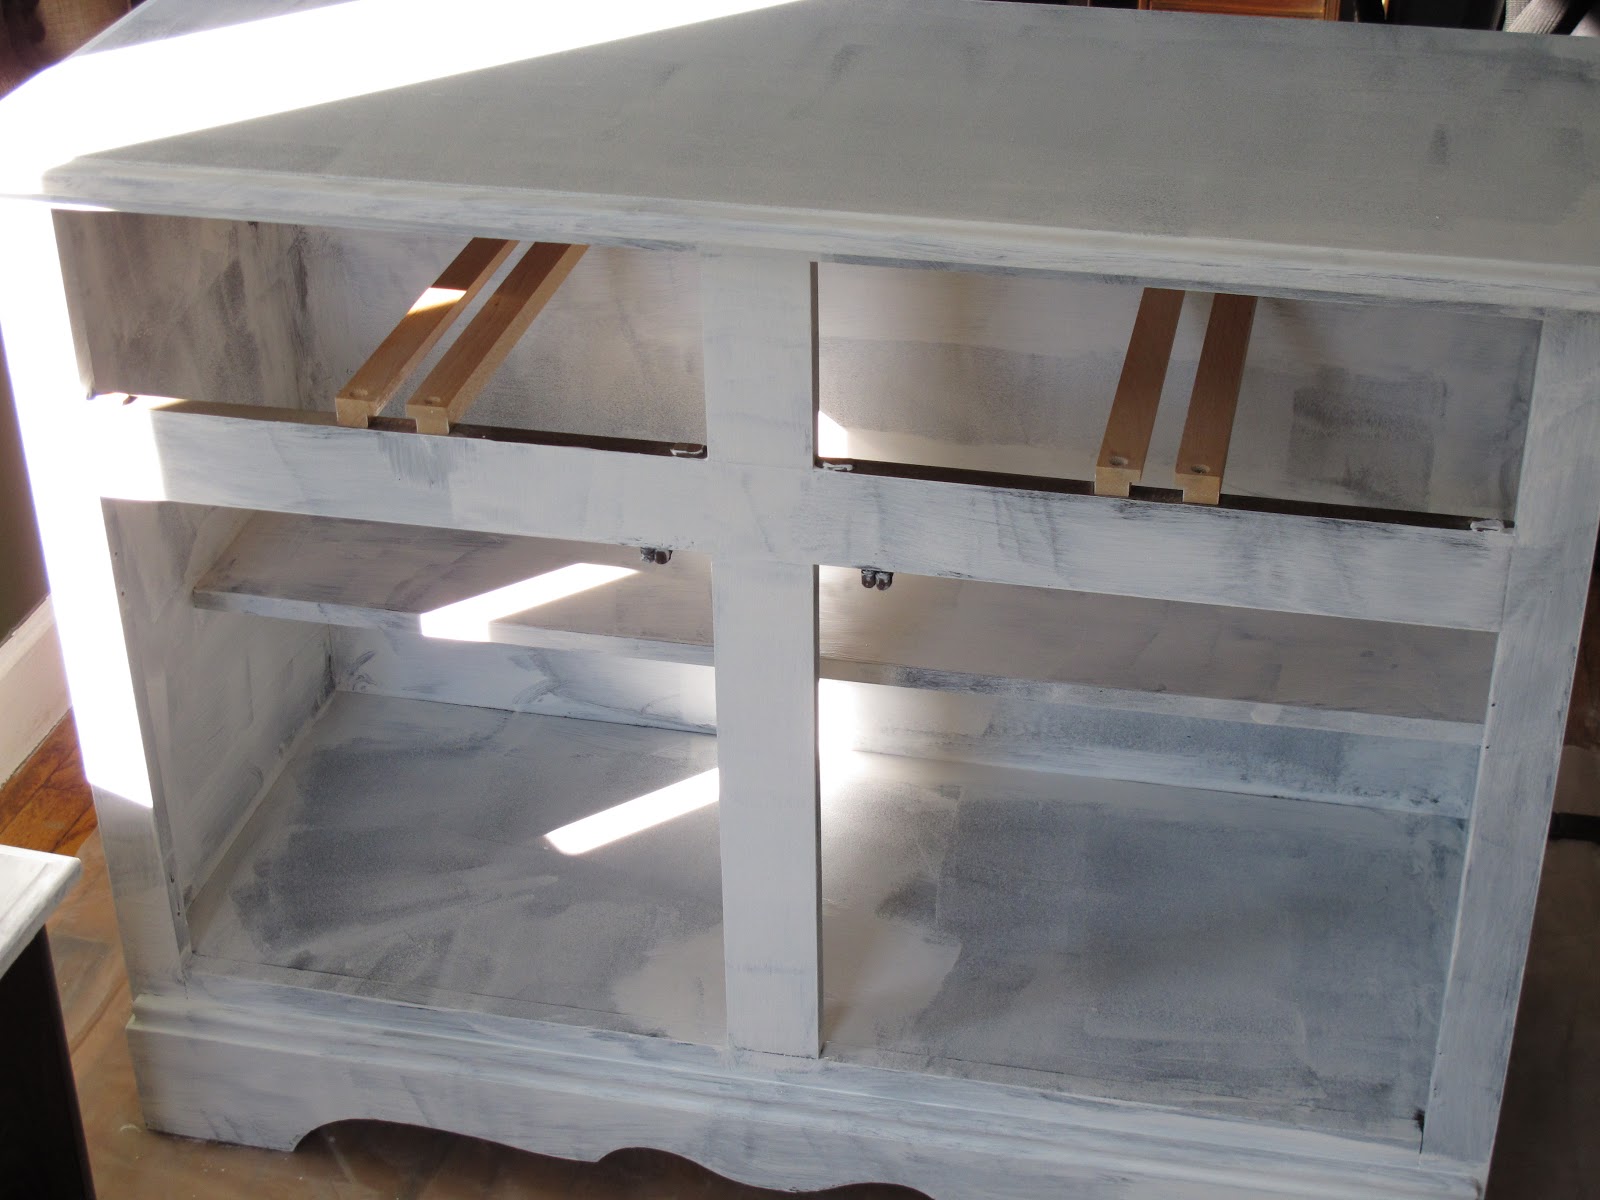
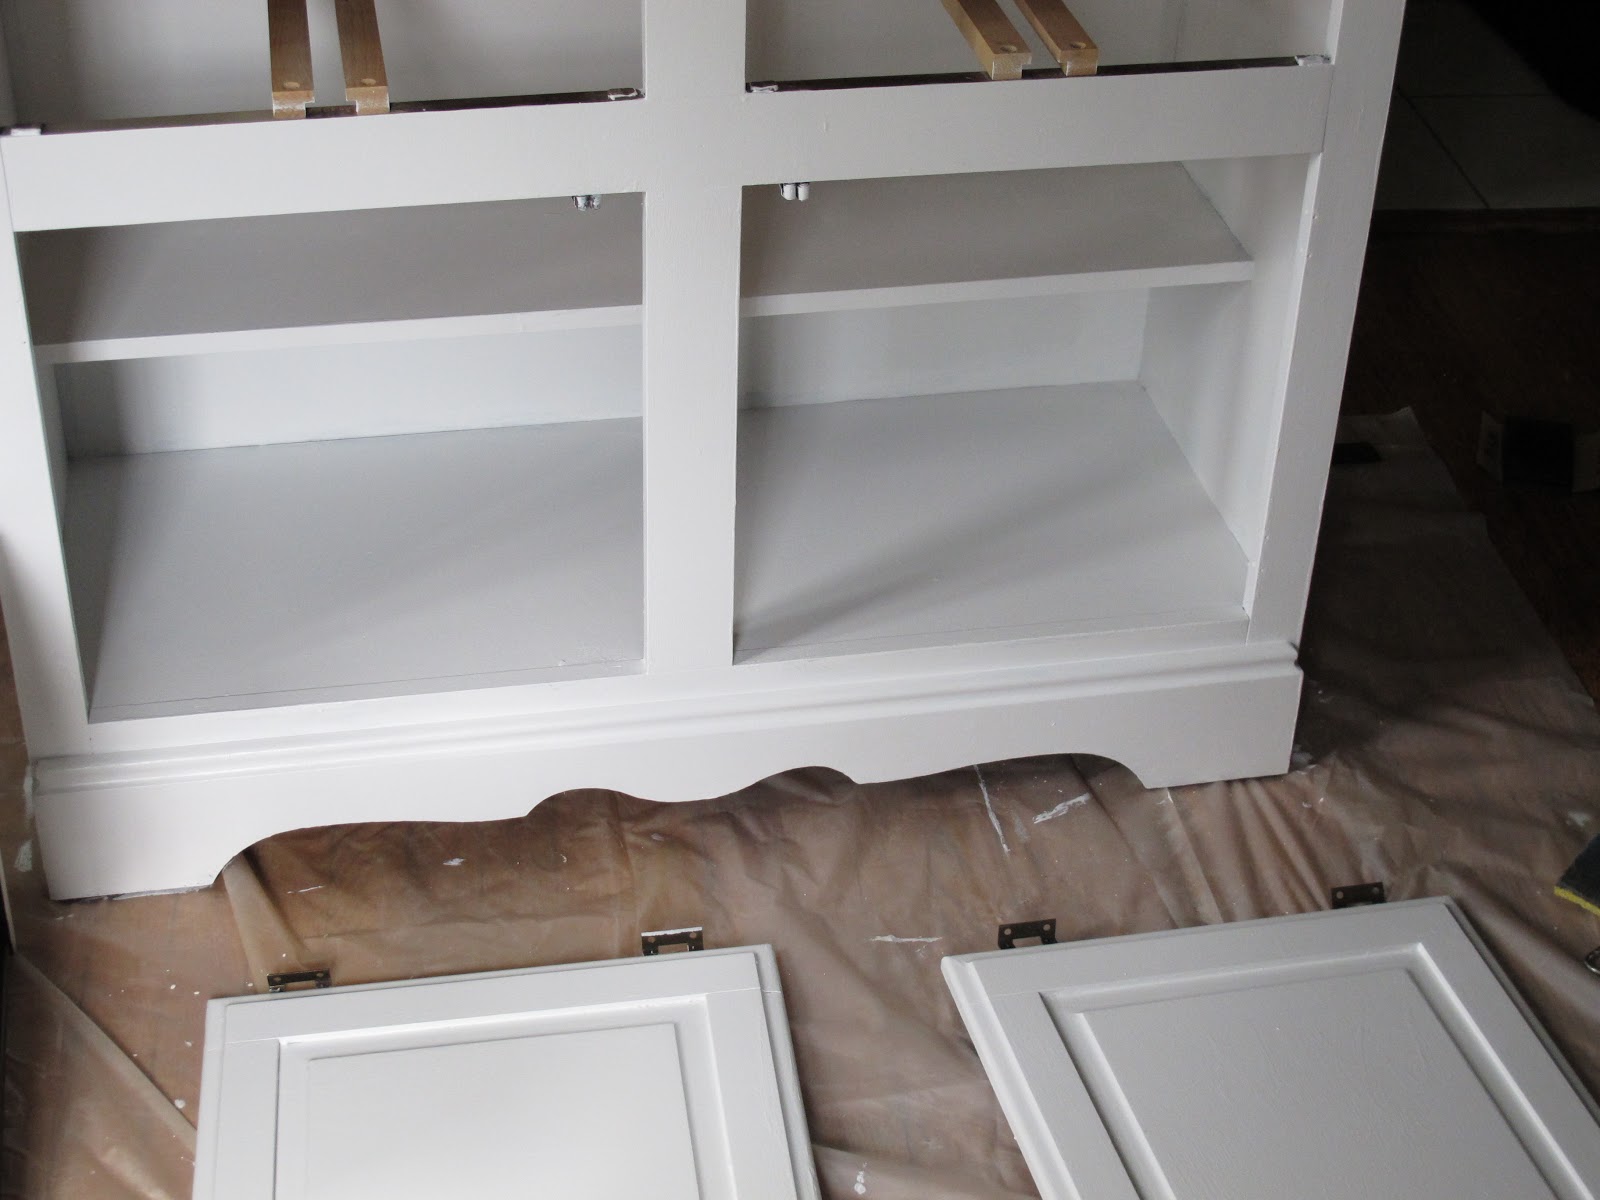
I've been hesitant to try my hand at painting furniture.  My fear was that my laziness and inexperience would get the best of me and I'd end up with a splotchy, messy, half-painted piece of junk.  Well, emboldened by the many encouraging Pinterest posts that promised me painting furniture was "easy as pie" and "fool-proof", I decided to take a gamble on transforming an old clunky dark wood/laminate server into a bright, white buffet for the dining room.  Here's how it went.

Before: although this photo doesn't really show the full (ugliness of the) buffet. 

I used the blog "Young House Love's" posts on painting furniture to guide my adventure. And now I can confidently say that the most important thing you will do in  painting your furniture is buying the right products. You might be tempted, as I was, to go for the cheaper stuff.  Don't do it.  It'll take way more coats to get the same coverage and durability.  At Young House Love's recommendation, I bought Zinsser's oil-based cover stain primer and a quality semi-gloss interior latex paint and they worked great.


After removing the doors and drawers and taking off the hardware, I wiped everything down and then started with a couple coats of the primer.  And no: I didn't sand.  That's why the Zinsser's is so great: no sanding required to get great coverage.  Although I will say oil-based is a b*tch to get off skin and paint brushes. You'll definitely need paint thinner.

I used a brush for the nooks and crannies but a small 6-inch foam roller for the rest.  As you'll see below, after the first coat I was worried.  It was splotchy and transparent and I worried that the whole project was ruined.   But the second coat worked wonders.  Stay the course, friends.

After one coat of primer: Not looking too great. 

After two coats of primer: much better. 
The primer was a quick drying, requiring only a two hour dry time between coats, so I also got two coats of paint in that same afternoon.  I just used a bright semi-gloss white by Olympic.  Worked just fine.  Then, boosted by the success of my efforts so far, I decided to add a faint gray accent (Gentle Rain by Behr) around the insets of the doors and drawers.  I taped the edges and brushed in two coats of the tinted paint. In the bright sunlight, it was hard to tell the difference between the gray and the white, but where it sits now, the gray worked nicely as a subtle contrast to add a little bit of interest.


In anticipation of all the bumps scrapes this guy will get as a server and buffet, I decided to finish the whole piece with two coats of a clear protective finish. I used Minwax Water-Based Polycrylic Protective Finish, rolling it on with the small foam roller.  I added four glass knobs from Home Depot and called it a day. 

All in all, the project took about $55 and 8 hours over two days to complete, and I'm pretty pleased with the result.  It really brightens up an otherwise dark corner of the dining room.  


 In addition to the new paint job, this little guy also got a some new accessories by way of three antique mason jars and an old cheese box, snagged for $10 total at an estate sale. Also, I pruned the rose bushes out front for winter giving the jars the perfect finishing touch.


Speaking of fun cheap antiquey finds, look at what my husband and I snagged at a thrift store this weekend.  They're waiting to be transformed for a fun Christmas project, but for now they're keeping our hearth company. Anyone up for learning some histology? 


Monday, October 1, 2012

Adventures in Canning (or, the journey of a green tomato)


With the cooler, autumn weather approaching,  I decided to clean out & winterize my vegetable garden this weekend.  The tomato plants, especially, had grown very bushy and were overflowing out of the raised bed, over the fence and into our neighbors yard.  And the past few tomatoes had sat--firm, green and unripe--taunting me for weeks. It was time for them to go.

But as I started yanking up plants and vines, I started noticing more than just a few unripened green tomatoes.  I rescued almost 40.  Initially, I was a little bitter; I missed out on 40 delicious vine-ripened tomatoes?? What a waste. But after a little research I discovered Green Tomato Relish, which is evidently how many gardeners choose to use end-of-the-season tomatoes.  Dice up a bunch of green tomatoes, onions, peppers, season, simmer in vinegar, store in cans and you're good to go.  Sounded like the perfect Sunday afternoon activity to me.

Some rescued veggies. 
Well, let me tell you: the original vision for a leisurely, 2-hour relish-creating afternoon quickly turned into a 5 hour-long saga. Canning, as it turns out, is no simple task.


First, of course, you have to chop up a BUNCH of veggies.  I washed and cored about 35 small-medium sized green tomatoes and then diced them, alongside three red bell peppers, three green bell peppers and six large yellow onions.  That's about 45 minutes worth of chopping.  


I had so many veggies that I actually had to separate the recipe into two 6 quart stock pots.  


To each pot, I added 1.5 TB of celery seed, 1.5 TB of mustard seed, .5 TB salt, 1 cup of cider vinegar and 2 cups of sugar. Yeah, I know; the amount of sugar surprised me too.  And I even reduced the amount of sugar in the recipe by a couple cups. I brought the pots to a boil and then reduced to a simmer for about an hour and a half.  During which time I started researching canning; and started to see my relaxing evening dissolve away. 


Canning is evidently all about being sterile.  First you have to boil all your mason jars and lids. "Even brand new, never been used jars?" You ask.  Yes. Even brand new jars.  So instead of plopping them all into boiling pots of water for 30 minutes, I opted for a slightly simpler method: the dishwasher.   Plus, my only two big stock pots were already in use.  According to some website, the water gets hot enough in the dishwasher to sufficiently sterilize the jars and lids.   So, one hour later, I have clean jars.

But then you have to fill the jars with the relish and pack down the relish to remove air, and you have to do it quickly, so as not to contaminate the contents. Then you screw on the lids and submerge the filled jars in boiling water for another 15-20 minutes. This combination of heat and pressure is what creates a vacuum seal on the jars, to preserve the contents without refrigeration.  Then, as the jars cool down, you hear the "pop" of the seal snapping down, which for me, was the much anticipated indication that my canning adventure had ended. So, you ask, how's it taste?


Better than expected, honestly.  We had some with our BBQ pulled pork sandwiches for dinner and it added a nice tangy dimension.  It's probably best on meats (hot dogs, bratwurst, burgers, fish), but I bet it'd be tasty with goat cheese and crackers, too.  Verdict: if you have an afternoon and 40 green tomatoes to kill, give it a go.  If not, stick to fresh salsas with ripened tomatoes.  Or bug me for a jar; my plan is to give most of the jars away as gifts. 


{PS: here's the original recipe from AllRecipes. I made a few minor changes noted above.}


Saturday, September 29, 2012

Trying my (not so steady) hand at painting


I recently spent an evening with some friends attending a Vino Van Gogh event.  Basically, they walk you through the techniques needed to paint a specific painting while you drink wine and chat with your girlfriends.  Sounds pretty awesome, right?  It was.  I anticipated being anxious about getting everything "right", but I ended up really loving the freedom of it all.  Don't like that color? Paint over it with another color and it changes.  Don't like the size of that stroke?  Do it again.  It was great.  And I went home with a pretty awful painting.  But it's still hanging on the wall of our back study.  It feels a little like a kid's crazy finger-painting that mom just can't help hanging on the fridge. Not because it's beautiful, but because it's significant nonetheless.  Except in this case I'm both the mom and the kid.  Here it is.


"Wildflowers" by me (with the help of some very nice Vino Van Gogh teachers)

But I enjoyed the experience so much that I decided to try it again.  But this time with something a little less "free-flowing" and a little more graphic.  I found this pin on Pinterest, chronicling the DIY process of creating a painting that I really loved.  Plus, it was done by one of my favorite home decorating blogs, Young House Love.  Seemed easy enough: draw a bunch of straight lines, divide the long segments into sections with 90* corners, and paint inside the lines with various soothing hues of blue and grey. And I just happened to have a big empty canvas hanging out in the basement.  Perfect. 

Except for the fact that you have to stay inside the lines.  Which in this case, is the whole point.  Crisp, straight graphic lines. But I persisted (for about 6 hours), shaky hand and all.  And it turned out okay. The borders aren't perfectly straight.  And the colors aren't exactly what I wanted.  But I'm good with it.  It's now hanging propped up on top of the radiator in our living room.  Here's some documentation of the process.  

Drawing very straight lines and points. 


The first color. 

Mixing colors. Might have been the best part. 
More colors. 

Done. Don't look too closely. 


Not perfect.  But good enough.