Saturday, September 29, 2012

The Big Kitchen Reno


Kitchen renovations are no joke, people.  They are expensive (about 2 times what we originally anticipated), long (about 2 weeks longer than we planned) and stressful (washing your dishes in the bathroom sink & having your refrigerator in your dining room, stressful). But, oh the blissful relief when you come out on the other side of it all with a kitchen you LOVE to be in, cook in, chat in and eat in.  We knew we wanted to make big changes: knocking out a wall, constructing a new breakfast bar, new floors, new cabinets, new countertops, new corner stairs.  In was almost a complete "gut", except for the fact that we left the sink, dishwasher and oven in the same place as before (so we didn't have to mess with too much plumbing and gas). Also, after crunching some numbers, we decided to wait on replacing the refrigerator and oven.  It was just too expensive for now and since we were going with a white and grey color scheme, the white appliances didn't seem too intrusive.  Hopefully we can just slide new (stainless) ones into place when we're ready to purchase them. 


Here's a before. Note: makeshift "cabinets" on the right wall (separating the kitchen from the dining room), the black and white checkerboard floor, the tan "textured" walls. 


The biggest change we made was knocking out that wall and putting up new cabinets that created a pass through and breakfast bar, shared with the dining room. We went with IKEA cabinets; partially because of cost, and partially because they came standard with all the bells and whistles (soft-close, storage solutions, etc.)  We had them shipped (in all their efficient flat-pack glory), which of course meant we had to put them all together.  Aside from one incident with the base corner cabinet (which I put together  and took back apart three times, at about 1am the night before the countertops were supposed to be measured), the assembly wasn't that big of a deal.  We've been very happy with the quality and I'm so glad we went with white; it feels so bright and clean. 


Here's a shot from the dining room.  We LOVE this breakfast bar.   It's fantastic to not be closed off in the kitchen by myself while I cook.  Now Jake can sit at the bar and we can chat while I chop.   We went with a modern, grey granite.  We got it at a great price and it included a new 60/40 under mount sink. Bonus!  Our only hesitation was how bold the contrast in the granite was.  It felt more modern than other choices, but it also felt a little busy. To balance it out, we went with a more classic Carerra marble subway tile backsplash and dark grey slate floors.


Here's the corner between the two windows, before reno.  


And here it is after reno.  We wanted to do cabinets all the way to the ceiling, to maximize storage and give us a chance to do some glass front displays.  And I talked Jake into doing the chunky floating shelves for some open storage, left of the stove.  I love the way it turned out.  Now we put items we use often here: sugar, oatmeal, tea, glasses.  We designed it so it mirrors the chamfered edge of the lower open shelving to the right of the oven.


Here's the corner with the stair pass through and the sink.  Before, it was a mess. Notice the uneven rises on the (sinking, plywood) stairs.  What a joke. 

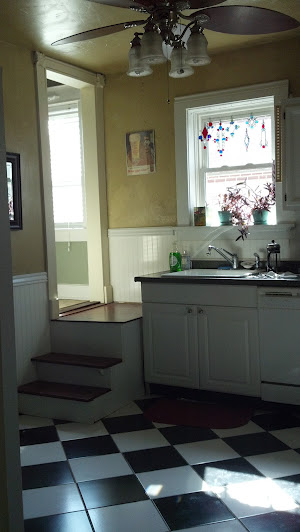
Now it feels much cleaner, sturdier and less like an after-thought.  Plus, we found a little unused space for storage...


Yep. Hidden storage drawers.  Making the most of our space was really important to us.  We wanted to make use of every available square foot.  


In the name of creative storage solutions, my brilliant designer husband came up with this "stud-cubbie" idea.  Basically, we created built-in shelves between the studs in this otherwise unusable wall.  It might be my favorite feature of the whole room.  We now use it to hold oil and vinegar, spices, and mason jars of rice and nuts.  Oh, and the occasional cute knick knack.  (Adorable ornamental tea-cup, anyone?) 


(Also, the mirror on the door to the basement serves double duty as a dry erase board to keep a running grocery list on.)


Another favorite station in the kitchen is the sink.  My mom made those glass sun catchers in the window (which I absolutely love), and I like keeping herbs and succulents on the window sill. Plus, the new sink is WAY better to wash dishes in. 


Trying my (not so steady) hand at painting


I recently spent an evening with some friends attending a Vino Van Gogh event.  Basically, they walk you through the techniques needed to paint a specific painting while you drink wine and chat with your girlfriends.  Sounds pretty awesome, right?  It was.  I anticipated being anxious about getting everything "right", but I ended up really loving the freedom of it all.  Don't like that color? Paint over it with another color and it changes.  Don't like the size of that stroke?  Do it again.  It was great.  And I went home with a pretty awful painting.  But it's still hanging on the wall of our back study.  It feels a little like a kid's crazy finger-painting that mom just can't help hanging on the fridge. Not because it's beautiful, but because it's significant nonetheless.  Except in this case I'm both the mom and the kid.  Here it is.


"Wildflowers" by me (with the help of some very nice Vino Van Gogh teachers)

But I enjoyed the experience so much that I decided to try it again.  But this time with something a little less "free-flowing" and a little more graphic.  I found this pin on Pinterest, chronicling the DIY process of creating a painting that I really loved.  Plus, it was done by one of my favorite home decorating blogs, Young House Love.  Seemed easy enough: draw a bunch of straight lines, divide the long segments into sections with 90* corners, and paint inside the lines with various soothing hues of blue and grey. And I just happened to have a big empty canvas hanging out in the basement.  Perfect. 

Except for the fact that you have to stay inside the lines.  Which in this case, is the whole point.  Crisp, straight graphic lines. But I persisted (for about 6 hours), shaky hand and all.  And it turned out okay. The borders aren't perfectly straight.  And the colors aren't exactly what I wanted.  But I'm good with it.  It's now hanging propped up on top of the radiator in our living room.  Here's some documentation of the process.  

Drawing very straight lines and points. 


The first color. 

Mixing colors. Might have been the best part. 
More colors. 

Done. Don't look too closely. 


Not perfect.  But good enough. 

Saturday, September 15, 2012

The Tacos of the Sea

If you're expecting a regular taco when you eat a fish taco, you'll be disappointed. Ask my husband. Cheesy and greasy they aren't.   But fish tacos are a fantastic option for a healthy (and cheap) weeknight meal.  Start to finish, prep takes about 30 minutes. That's my required tri-fecta of cooking: cheap, quick, healthy. And the mexican avocado slaw is great both as a side dish, and as a taco topping.  Add a greek yogurt-based chipotle creme, and you've got yourself a gourmet fish taco. This is my combination of a few great recipes I found online (my Pinterest page has links to the original recipes).  It'll make you six small-ish tacos.


Chipotle Creme
1/2 cup Greek yogurt
1 chipotle pepper in adobo sauce, minced

Mexican Avocado Slaw
2 avocados, diced
1 mango, diced
3-4 cups shredded cabbage
1/2 red onion, finely sliced
medium jalepano, minced
handful of cherry tomatos, quartered

Dressing:
1/4 cup EVOO
juice of 2-3 limes
pinch of salt
1 tsp honey

Pan Fried Tilapia
3 frozen tilapia filets, thawed
1/2 cup corn meal
1 tsp paprika
salt and pepper
1-2 TB olive oil

1. Thaw the tilapia filets. Cut longways so each filet creates two long pieces.
2. Combine the cornmeal, paprika and a dash of salt and pepper.  Coat each piece of tilapia.
3. Heat olive oil in frying pan over medium-high heat.
4. Fry fish in olive oil, 3-4 minutes per side.
5. Serve with mexican avocado slaw and chipotle creme on a corn tortilla.

Mexican avocado slaw. 


Considering I got all but the cilantro and chipotle peppers at Aldi's, this meal was pretty cheap (why won't Aldi's supply fresh herbs?).   I buy the tilapia frozen in bulk, so each filet ends up costing about $.60.  And Aldi's now has Fage yogurt ($3.20), mangos ($.80) and avocados ($.39).  The total cost of this meal is less than $10 (assuming you don't use a whole container of yogurt, chipotle peppers, etc.) And yes, Jake ended up loving them, as well. See you again soon, tacos of the sea!


To Pick an Apple

Add caption

Last weekend we took a trip with some friends to Eckert's Apple Farm. The weather was perfect (crisp, sunny, fresh) and the apples were delish. 


Any apples you eat while picking are free!  

A Jonathan ready for the picking. 

The handy high-picker, to jostle down apples that are beyond arm's reach. 

Jake's American Gothic. 


The pickers. 


Tuesday, September 4, 2012

A Place to Eat


Jake and I are big fans of eating. We love it.  So we wanted to put some lovin' into our dining room, the main location for all our eating (ignoring, of course, all the meals we eat in front of the TV...shameful, I know). A quick reminder of the "before":


The very beige and red "Before". 


A brighter, cleaner "after". 

We power sanded all the walls and painted a light "porpoise" grey, with crisp white trim.  Added some accessories and framed some of the beer coasters Jake has collected over the years on the back wall.  The pink coaster in the middle is the one we made as "save the dates" for our wedding guests.


This chair I bought at St. Vincent's for $5! They were having a sale and while I didn't have an acute need for a new chair, I couldn't pass up the deal.  And you can always use more seating in a dining room, right?  All I had to do was recover the cushion. I stuck with the greys and whites.  I love this fabric; I got some extra yardage so hopefully I can use it again somewhere.  


I also snagged these "silver" trays at St. Vincents for about a dollar a piece.  And the silver bird is from TJ Maxx for about $6.  I think it creates a nice little arrangement above the hutch holding all our bar supplies. 


I guess I'm missing a few pictures.  Mainly of the wall between the dining room and the kitchen, which *SURPRISE* isn't there anymore!  This past spring we completely renovated the kitchen; I guess I'll save that for another post though. For now, just a couple more photos of the dining room. 


Anniversary flowers from my wonderful husband. 


Kamut is a... berry?

Kamut Berry Pilaf with Caluiflower and Butternut Squash


I stumbled across this recipe on Pinterest (good ole' Pinterest; pointing me to all things interesting) and thought "What in the world is kamut berry?".  It sounded a little like "Mr. Pamuk", from Downton Abbey; as in:

 Lady Mary: "You mean my lover, mother, Mr. Pamuk?".

Which of course made me want to try it. I looked it up and it turns out kamut just means wheat.  But it's a nice hearty wheat, high in fiber and iron.  And because September just started, we have a plump grocery budget, so I wasn't too worried about the potentially bank-busting cost of the mysterious "kamut".  Come to find out, kamut might just be the cheapest thing at Whole Foods: it's $1.59 a pound.  And I only needed a pound.  (Actually the recipe calls for less.)

Well, what kamut gained in expense, it lost in cooking time.  Evidently from dry, it would take 2 hours to cook a pound of kamut.  Yikes.  But I did a little internet snooping and found a site that recommended soaking the grain overnight to cut down on cooking time.  Worked great.  It only took 30 minutes to cook.

Uncooked kamut. 

Cooked kamut. 

The berries taste better than I expected; they are nutty, chewy and buttery and have a little "pop" to them.  Probably wouldn't eat them alone, but lucky for me the recipe called for all sorts of fun additions: roasted cauliflower, roasted butternut squash, carmelized shallots and red onions, sherry vinegar, almond slices and fresh parsley.

Roasted cauliflower and butternut squash. 

Just starting the onions and shallots in olive oil. 

I have to say, for a vegan meal, this was delicious. Normally if I eat vegetarian, I have to pile the cheese on to feel satisfied.  This recipe didn't need anything else; it had all sorts of nice textures and flavors.  And it totally filled us up!


Finished product!